Fluent Validation In Asp.net Core
This tutorial demontrates how to setup Fluent Validation in ASP.NET Core.
Background
ASP.NET Core is a redesign of ASP.NET aimed for building modern cloud based internet connected applications. It is open-source, modular and cross-platform.
Fluent Validation, written by Jeremy Skinner, is a popular .NET library used for building validation rules with a fluent interface and lambda expressions.
This tutorial demonstrates how to setup Fluent Validation in ASP.NET Core in a basic manner.
Prerequisites
The following assumes that you already have the necessary to develop an application with ASP.NET Core. If you don’t, the easiest way on Windows is with Visual Studio.
Getting Started
Basic Web API application
The official ASP.NET Core documentation provides a fairly detailed tutorial on how to build a basic Web API application with ASP.NET Core MVC and Visual Studio.
This tutorial assumes that you follow the documentation Building Your First Web API with ASP.NET Core MVC and Visual Studio.
Integrate FluentValidation
Include Necessary References
In order to use FluentValidation, you need to include the necessary dependencies in the project.json. Once completed, it should look like the following
"dependencies": {
    "Microsoft.NETCore.App": {
      "version": "1.0.0",
      "type": "platform"
    },

    ...

    "FluentValidation": "6.4.0-beta3",
    "FluentValidation.AspNetCore": "6.4.0-beta3"

    ...

  },
Create a Validator
The next step is to create a validator object to perform the actual validation. I like to keep them in a separate folder validator. Let’s say that we simply want to make sure that no fields is empty, we would create a class as follow.
namespace FluentValidationSample.Validators
{
    using FluentValidation;
    using Models;

    public class TodoItemValidator : AbstractValidator<TodoItem>
    {
        public TodoItemValidator()
        {
            this.RuleFor(request => request.Name).NotEmpty();
        }
    }
}
Decorate the Model
Once a validator created, you need to decorate the model with a specific attribute in order for the validation to be taken for account. In our case, the TodoItem should be as follow
namespace FluentValidationSample.Models
{
    using FluentValidation.Attributes;
    using Validators;

    [Validator(typeof(TodoItemValidator))]
    public class TodoItem
    {
        public string Key { get; set; }
        public string Name { get; set; }
        public bool IsComplete { get; set; }
    }
}
Validate the Model
In the TodoController controller, you can verify the validness of the model with this.ModelState.IsValid. For instance, the Create function will be as follow
...

[HttpPost]
public IActionResult Create([FromBody] TodoItem item)
{
    if (item == null || !this.ModelState.IsValid)
    {
        return this.BadRequest();
    }

    this.TodoItems.Add(item);
    return this.CreatedAtRoute("GetTodo", new { id = item.Key }, item);
}

...
Hook up the Services and Dependencies
In the Startup.cs, you will need to load the FluentValidation service. In ConfigureServices, change
services.AddMvc();
to
services.AddMvc().AddFluentValidation();
Similarly, you will need to register the validator in the inversion of control container otherwise it will not be loaded and the validation will not be performed. Right after services.AddMvc().AddFluentValidation();, add the following
services.AddSingleton<IValidator<TodoItem>, TodoItemValidator>();
Test with Postman
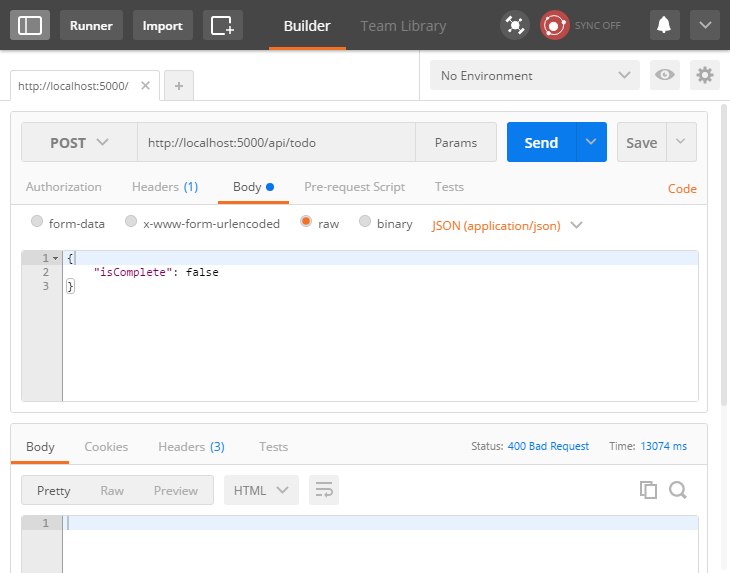
If you test with Postman as follow, you should see that the return is 400 Bad Request since the name is missing.

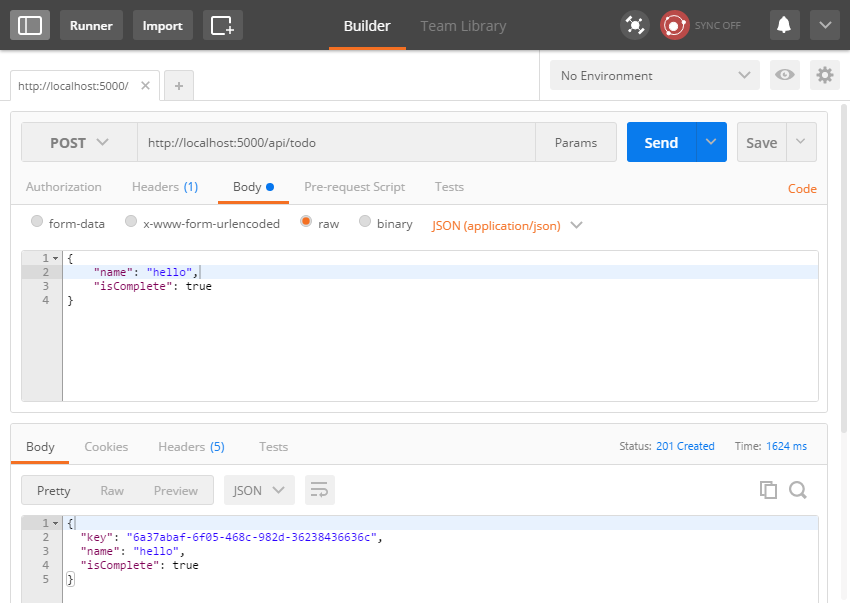
However, the following should give 201 Created.

Further Information
This was a basic introduction to Fluent Validation using ASP.NET Core. For further information, I invite you to read the wiki.


Leave a Comment
Your email address will not be published. Required fields are marked *