Using Custom Renderers To Display Ads From Google Admob On Xamarin.forms
How to use Custom Renders to display ads from Google AdMob on Xamarin.Forms. This tutorial outlines the necessary steps for Android and Windows Phone but can easily be extended for iOS devices and for other ads libraries.
Background
Xamarin.Forms support several UI elements for Pages (ContentPage, NavigationPage, TabbedPage, etc.), Layouts (StackLayout, GridLayout, ScrollView, etc.), and Controls (Button, Image, Label, etc.). Each of these elements are rendered into their native equivalents on each platform.
But what about elements without native equivalents like ads from Google AdMob? Luckily, you can use Custom Renders for that.
Prerequisites
The following assumes that you are already familiar with Google AdMob. If you are not, you can look it up from the links below.
Getting Started
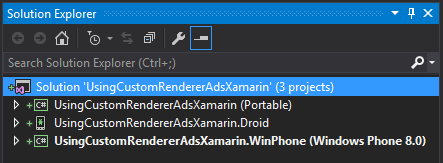
You will need to create a Xamarin.Forms project. The samples will be featuring the Portable version but you can easily adapt the code for the Shared version.

Your solution should be similar to

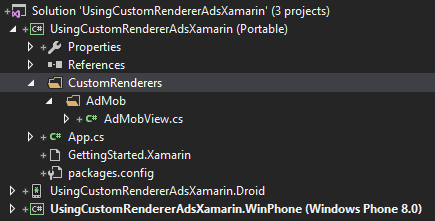
Portable
In the Portable project, you will need to create a class that inherits from Xamarin.Forms.View.

using Xamarin.Forms;

namespace UsingCustomRendererAdsXamarin.CustomRenderers.AdMob
{
    public class AdMobView : View
    {
        // enables data binding for the AdMob ad unit id
        public static read-only BindableProperty AdUnitIdProperty =
            BindableProperty.Create<AdMobView, string>(p => p.AdUnitId, "");

        // holds the AdMob ad unit id
        public string AdUnitId
        {
            get
            {
                return (string)this.GetValue(AdUnitIdProperty);
            }
            set
            {
                this.SetValue(AdUnitIdProperty, value);
            }
        }
    }
}
In order to the display the ads, we will make a simple modification to the default App.cs file generated for us.
using UsingCustomRendererAdsXamarin.CustomRenderers.AdMob;

using Xamarin.Forms;

namespace UsingCustomRendererAdsXamarin
{
    public class App : Application
    {
        public App()
        {
            // create the ads
            var ads = new AdMobView();
            if (Device.OS == TargetPlatform.WinPhone)
            {
                ads.AdUnitId = "WINDOWS_PHONE_AD_UNIT_ID";
            }

            if (Device.OS == TargetPlatform.Android)
            {
                ads.AdUnitId = "ANDROID_AD_UNIT_ID";
            }

            // include the ads
            this.MainPage = new ContentPage
            {
                Content = new StackLayout
                {
                    VerticalOptions = LayoutOptions.Center,
                    Children = {
                        new Label
                            {
                                Text = "Hello Ads"
                            },
                        ads
                    }
                }
            };
        }

        protected override void OnStart()
        {
            // Handle when your app starts
        }

        protected override void OnSleep()
        {
            // Handle when your app sleeps
        }

        protected override void OnResume()
        {
            // Handle when your app resumes
        }
    }
}
Android
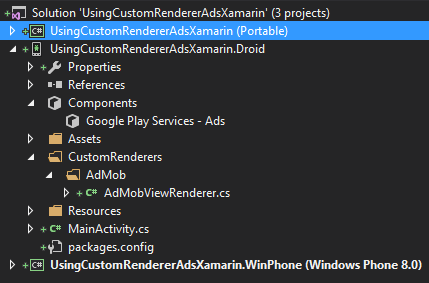
In the Android project, you will need to add the Google Play Services - Ads Xamarin component and create a class that inherits from Xamarin.Forms.Platform.Android.ViewRenderer that maps a cross-platform element to a native element.

using Android.Gms.Ads;

using UsingCustomRendererAdsXamarin.CustomRenderers.AdMob;
using UsingCustomRendererAdsXamarin.Droid.CustomRenderers.AdMob;

using Xamarin.Forms;
using Xamarin.Forms.Platform.Android;

// registers the ViewRenderer
[assembly: ExportRenderer(typeof(AdMobView), typeof(AdMobViewRenderer))]
namespace UsingCustomRendererAdsXamarin.Droid.CustomRenderers.AdMob
{
    // creates the renderer that 'maps' the cross-platform element to the native element
    public class AdMobViewRenderer : ViewRenderer<AdMobView, AdView>
    {
        public static void Init()
        {

        }

        // renders the native element
        protected override void OnElementChanged(ElementChangedEventArgs<AdMobView> e)
        {
            base.OnElementChanged(e);

            var adMobElement = this.Element;

            if (adMobElement != null && e.OldElement == null)
            {
                // declare the native element
                // assign the necessary properties like the Ad Unit Id
                AdView ad = new AdView(this.Context);
                ad.AdSize = AdSize.Banner;
                ad.AdUnitId = adMobElement.AdUnitId;
                var builder = new AdRequest.Builder();

                #if DEBUG
                // Google requires the usage of test ads while debugging
                builder.AddTestDevice(AdRequest.DeviceIdEmulator);
                #endif

                var adRequest = builder.Build();

                ad.LoadAd(adRequest);
                this.SetNativeControl(ad);
            }
        }
    }
}
Afterward, you need to edit the AndroidManifest.xml under Properties to allow ACCESS_NETWORK_STATE and INTERNET as well as declaring ads activity.
Once this is completed, you can run the application. Note that it may takes a few start for the ads to warm up and display.
Windows Phone
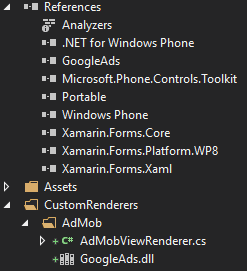
In Windows Phone, you will need to include the ‘Google Mobile Ads SDK’ mentionned above as a reference and and create a class that inherits from Xamarin.Forms.Platform.WinPhone.ViewRenderer that maps a cross-platform element to a native element.

using GoogleAds;

using UsingCustomRendererAdsXamarin.CustomRenderers.AdMob;
using UsingCustomRendererAdsXamarin.WinPhone.CustomRenderers.AdMob;

using Xamarin.Forms;
using Xamarin.Forms.Platform.WinPhone;

[assembly: ExportRenderer(typeof(AdMobView), typeof(AdMobViewRenderer))]
namespace UsingCustomRendererAdsXamarin.WinPhone.CustomRenderers.AdMob
{
    public class AdMobViewRenderer : ViewRenderer<AdMobView, AdView>
    {
        ///
        /// Used for registration with dependency service
        ///

        public static void Init()
        {
        }

        protected override void OnElementChanged(ElementChangedEventArgs<AdMobView> elementChangedEventArgs)
        {
            base.OnElementChanged(elementChangedEventArgs);

            var adMobElement = this.Element;

            if ((adMobElement != null) && (elementChangedEventArgs.OldElement == null))
            {
                var bannerAd = new AdView
                {
                    Format = AdFormats.Banner,
                    AdUnitID = adMobElement.AdUnitId,
                };

                var adRequest = new AdRequest();
                #if DEBUG
                // use test ads in debug mode
                adRequest.ForceTesting = true;
                #endif
                bannerAd.LoadAd(adRequest);
                this.Children.Add(bannerAd);
            }
        }
    }
}
Afterward, update the manifest ‘WMAppManifest.xml’ to include the following capabilities.
- ID_CAP_NETWORKING
- ID_CAP_WEBBROWSERCOMPONENT
- ID_CAP_MEDIALIB_PLAYBACK
- ID_CAP_MEDIALIB_AUDIO
Once this is completed, you can run the application. Note that it may takes a few start for the ads to warm up and display.


Leave a Comment
Your email address will not be published. Required fields are marked *